UIテーブルビューを使ってみる
曲が一覧でズラッと並んだような表示を提供する、UITableViewを使ってみましょう。下の画像は、今回作成するアプリの完成予定図です。
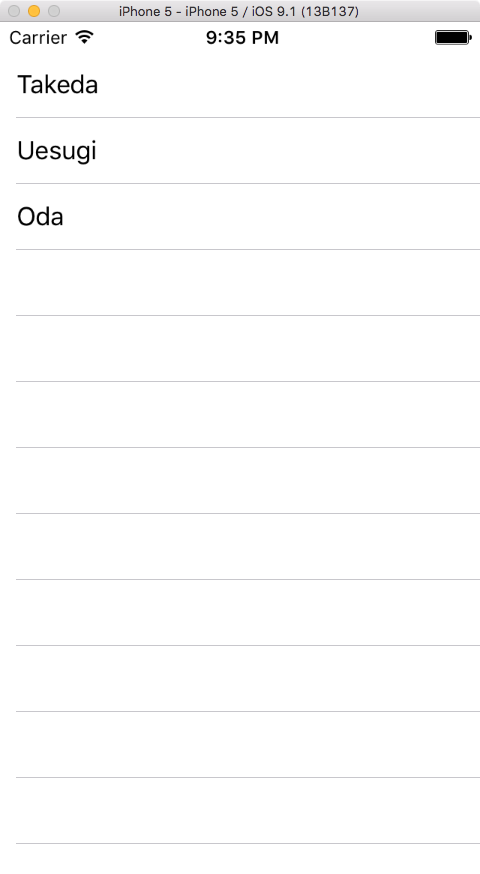
完成予定図
三名の 武将の名前が表示されています。
このアプリは結局何をやっているかというと、以下の配列の中身を表示しているだけです。
let busyous = [ "Takeda", "Uesugi", "Oda"]
この配列の中身を表示する手段として、TableViewを使用してます。
こんな単純なものでも、結構手間がかかるのです。
開発環境
UITableViewアプリを作成しよう!
適宜シミュレーターで実行して、動くか確認しながら作っていきましょう!
- まずは新規プロジェクトを作成しましょう。テンプレートは Single View Application を選択し、プロジェクト名は TableView Demo にしました。
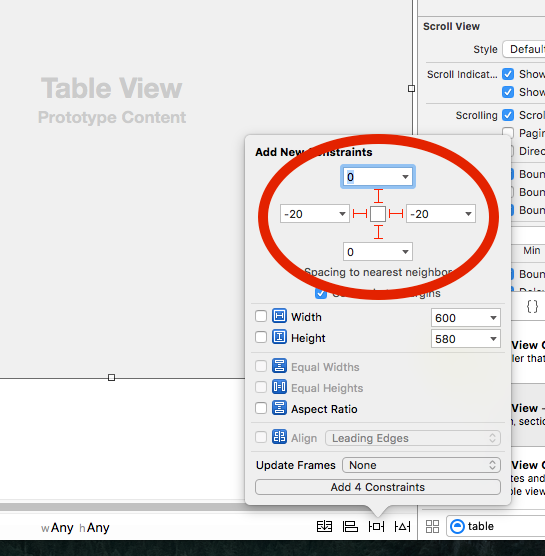
- Main.storyboardを開き、メインのビューに TableView を追加します。それを目一杯広げて、上下左右がぴったりビューにくっつくように Constraints を追加します。
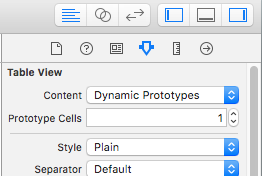
- TableView を選択した状態で Attributes Inspector のPrototype Cells を1にします。TableView の表示が変わりましたか?追加されたものを「プロトタイプセル」と呼びます。"Takeda" "Uesugi"などが表示される基のセルです。
-
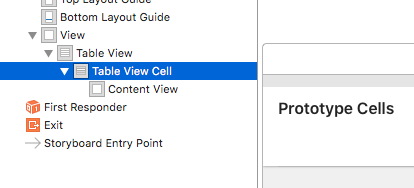
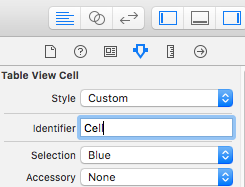
追加されたプロトタイプセルを選択して、Attributes Inspector の Identifier に Cell と入力します。
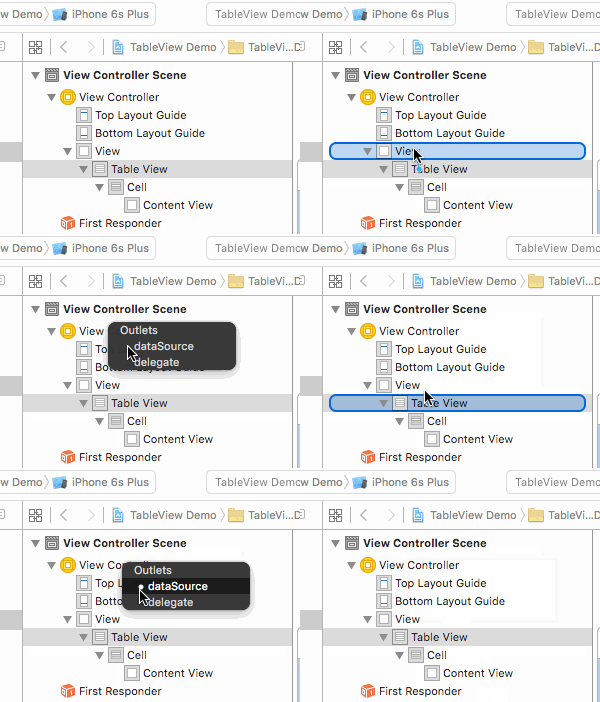
- TableView から 右クリックをしながら ViewController まで引っ張ります。右クリックを離したら表示される画面の dataSource と delegate を選択します。
-
ViewController.swiftを開き、クラス宣言に UITableViewDelegate を追加します。 あと少しです!頑張りましょう!!
// 変更前 class ViewController: UIViewController {
class ViewController: UIViewController, UITableViewDelegate { -
viewDidLoad関数の上に、今回表示する内容を含んだ配列を書きます。
-
2つの関数を ViewController クラス内に追加します。
- func tableView(tableView: UITableView, numberOfRowsInSection section: Int) -> Int
- func tableView(tableView: UITableView, cellForRowAtIndexPath indexPath: NSIndexPath) -> UITableViewCell
一つ目の関数は、TableViewのセクション中のセルの数を聞いています。今回は busyous 配列の要素数を返します。
二つ目の関数は、TableView に表示するセルを作成します。busyous の要素を表示させましょう。
- 先ほどの関数の中身を書きます
func tableView(tableView: UITableView, numberOfRowsInSection section: Int) -> Int {dequeueReusableCellWithIdentifier("Cell", forIndexPath: indexPath) は、手順4で "Cell" と名付けたプロトタイプセルを使い回すよ、というメソッドです。
return busyous.count
}
func tableView(tableView: UITableView, cellForRowAtIndexPath indexPath: NSIndexPath) -> UITableViewCell {
let cell = tableView.dequeueReusableCellWithIdentifier("Cell", forIndexPath: indexPath)
cell.textLabel?.text = busyous[indexPath.row]
return cell
}
完成!!
シミュレータで実行してみましょう。最初に見た画面が表示されましたか?

表示されましたね。おめでとうございます!!これが TableView の基本的な使い方です。
まとめ
TableViewを使用するのに大事なのは以下4点です。
- 表示する内容を持った配列を用意すること
- dataSource, delegate を設定すること
- func tableView(tableView: UITableView, numberOfRowsInSection section: Int) -> Int
- func tableView(tableView: UITableView, cellForRowAtIndexPath indexPath: NSIndexPath) -> UITableViewCell